August 29, 2019 4:10 pm
3 DIY Experiments to Rock the Science Fair This Year
Brachistochrones, cosmic ray detectors, light wave diffraction, and more!
Today’s guest blog post is by StarTalk intern Kirk Long. Kirk will graduate in the spring with his Bachelor’s in astrophysics with minors in applied mathematics and music at Boise State University, and he is currently applying for Ph.D. programs to hopefully continue his studies in astrophysics! He spends his summer weekends working at the largest public observatory in Idaho, the Bruneau Sand Dunes State Park Observatory, where he gives educational astronomy presentations and operates various large telescopes for the public.
Back to school season is here, which means it’s the perfect time to start thinking of ways you (or your kids) can dominate the science fair this year. I’ve put together a fun starter list of budget friendly experiments that are a little off the beaten path yet still manage to showcase some super cool physics. There’s lots of ways to make each of these ideas your own, and countless ways to tinker or add on to these experiments. Send us pictures and lab reports with your results!
1. The marble brachistochrone!
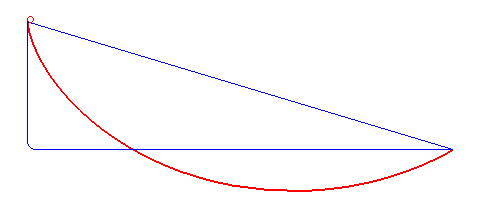
Given the following paths, which one is fastest? Source: Wikipedia.
The brachistochrone is a famous physics problem that tickled the minds of great scientists like Bernoulli and Newton—if an object is to travel between two points acted on only by gravity, what is the path of least time? Bernoulli first proposed the problem in 1696, and asked that other scientists attempt to submit their solutions in six months. None came at first, so the deadline was extended and ultimately five solutions were received — the most famous of which came from Isaac Newton. Newton supposedly found the challenge in a letter from Bernoulli at the beginning of 1697, and after receiving it he stayed up all night to solve it, mailing it off anonymously the next day. It reportedly took Bernoulli weeks to generate his solution, and although Newton submitted anonymously Bernoulli reportedly recognized it as his work immediately, saying that he “recognizes a lion from his claw mark.”
Solving this problem requires some fancy calculus and geometry, but the basic idea behind the solution is relatively simple. Although the straight path is the path of shortest distance, it’s not the path of least time because it takes longer to build up speed! The ideal path builds up speed quickly in the beginning, but does so without adding too much length — and it turns out that the solution that correctly balances these two factors yields a cycloid.

Here is a fun GIF showing how a cycloid is defined! Source: Wikipedia user Zorgit.
To build your own all you need is an object to roll and a track that it can roll down. I’ve had great results using an old marble coaster set I had lying around but you can use pretty much anything as long as it’s flexible or can be cut to the right shape! The higher your ramp is the more dramatic the difference will be. Simply search an image of a cycloid to use as your template, and connect the two points you want to build your ramp between using that as a guide. You can also tinker back and forth with varying degrees of curvature through trial and error until you find the best curve!
2. A miniature cloud chamber particle detector!
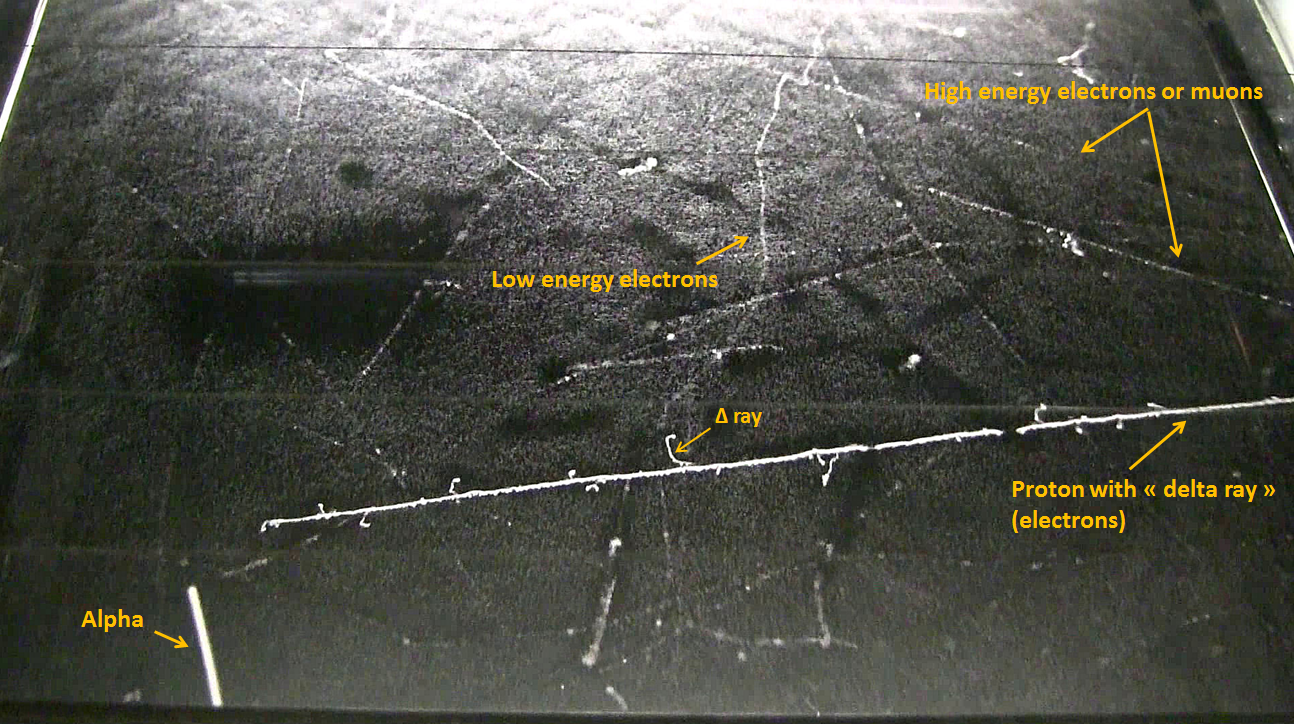
A cloud chamber with various particle tracks. Source: Wikipedia/Cloudylabs.
This is a surprisingly cheap and easy to make project that is sure to wow! The simplest version involves only dry ice, a mason jar, felt, isopropyl alcohol, and a flashlight. If you have a fish tank lying around you can build a slightly more involved version that’s still pretty budget friendly, and for around $70 you can even buy a small radioactive source (don’t worry, it’s safe!) that will really take your chamber to the next level.
To build this project, take your clear container (mason jar, fish tank, whatever) and glue/tape the felt onto the bottom of the glass. Soak the felt in isopropyl alcohol (the higher the concentration the better), then seal up your container with some kind of metallic/conductive lid (if you’re using a mason jar the built-in metal lid works fine). Let it stand for 5-10 minutes in a dark place, then shine your flashlight on it and check to see if you have an alcohol vapor cloud. The dry ice creates a nice temperature gradient in your chamber, allowing the vapor that has evaporated off the felt to drift towards the bottom and start to condense. If you don’t have a good cloud it might be too cool for the alcohol to evaporate off of the felt—you can remedy this by placing something hot on the felt side (a bag or pot of hot water works great). Shine your flashlight through the cloud and watch for tracks! As charged particles crash into your chamber and collide with the alcohol vapor they ionize it, which causes it to quickly precipitate out and leaves behind those cool tracks. Different tracks represent different kinds of particles — see how many you can spot! Some of the tracks you see may even originate from deep space cosmic rays, which is super cool. If you have a radiation source, place it in/near your chamber to witness a dramatic display of radioactive decay.
3. Exploring the wave nature of light!
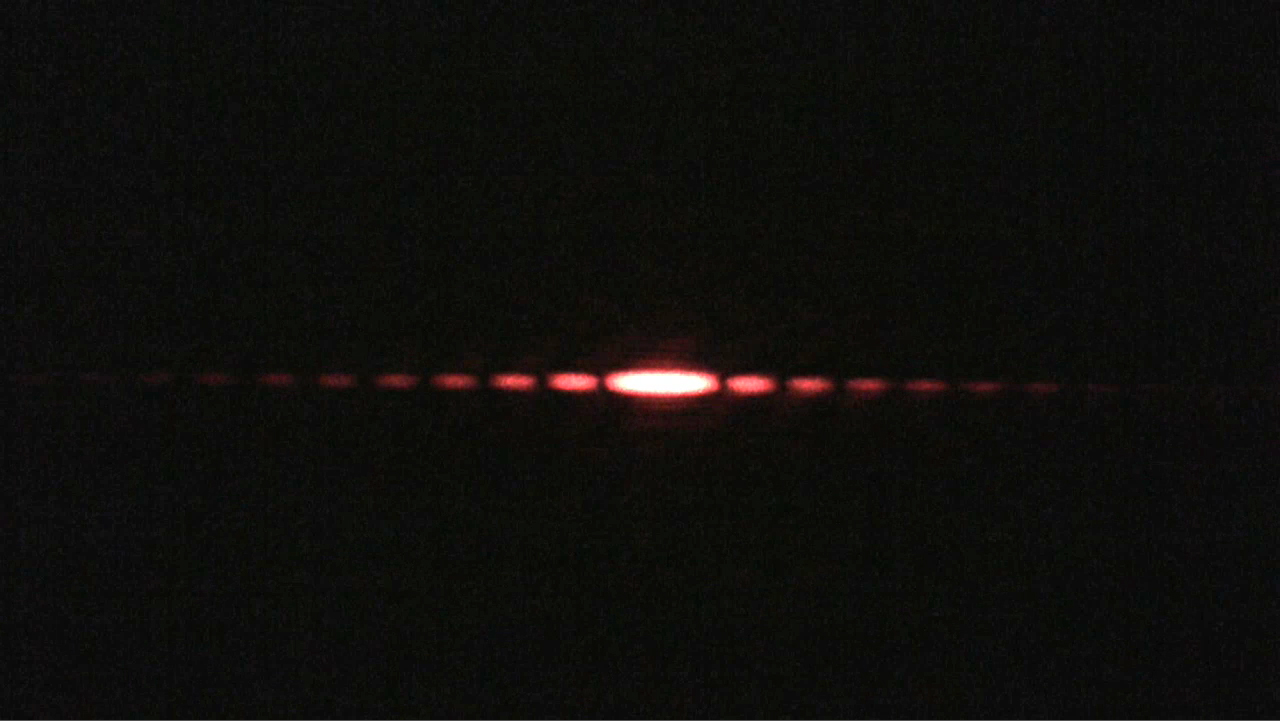
The pattern produced by single slit diffraction of red laser light. Source: MIT.
You might have heard that light acts as both a particle and a wave, but its wave nature was more surprising to many scientists than the particle side! To demonstrate light’s properties as a wave all you need is a laser pointer, an Exacto knife, and some aluminum foil.
Cut out a small square of aluminum foil, and try to keep it as unwrinkled as possible. If you have some spare cardboard lying around you can make a DIY “slide” by cutting out a cardboard frame and taping the foil over it. Cut an incision into the foil as straight and as narrow as possible using your Exacto knife, then shine your laser through the slit in front of a nearby wall or other screen. If light were simply a stream of particles we would expect to just see an outline of the slit, but instead we see an incredible diffraction pattern. This is caused by light waves interfering with each other—the bright spots are places where the interference is constructive and the dark areas are places where it’s destructive. This happens because light travelling from one side of the slit actually travels a slightly different distance to the a point laterally along the screen than light on the other side, and when this difference is equal to an integer multiple of half the wavelength of light they cancel out (the high part of one matches up with the low part of the other) and when it is equal to an integer multiple (the parts of both match up) they add together! If you have different colored lasers try these out and notice what happens to the pattern, and try adding more slits to explore what effect that has. This phenomena is reversible too—if you take one of your hairs and suspend it taught in the laser beam, you’ll see a complementary pattern emerge (this is called Babinet’s principle). You can actually determine the width of your hair in this way if you know the wavelength of the laser, the distance from the hair to the pattern on the screen, and the distance between the minima/maxima on the pattern itself. If you have a spare CD/DVD lying around, another fun and easy to make extension of this activity is to build your own spectrometer. Tinker and have fun!
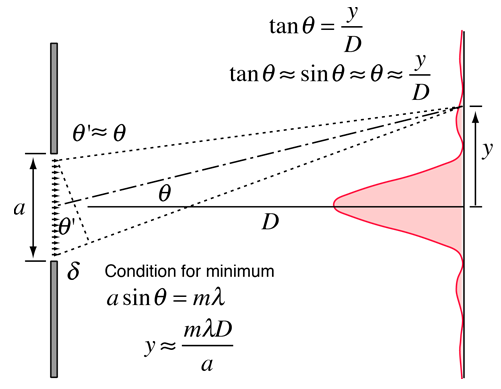
A technical schematic that shows a little more of the nitty gritty behind what’s going on to cause the interference pattern you see when you shine the laser through the slit. Source: Hyperphysics.
If you have any other super cool science fair ideas you want to share with our readers/listeners don’t hesitate to drop them in the comments. Happy sciencing and stay curious!
Get the most out of StarTalk!
Ad-Free Audio Downloads
Priority Cosmic Queries
Patreon Exclusive AMAs
Signed Books from Neil
Live Streams with Neil
Learn the Meaning of Life
...and much more
 Become a Patron